背景 以前本博客是借助Travis来进行CI的,配置NodeJs及Hexo环境自动编译等。有兴趣,可以看看,该文章:https://nimbusk.cc/post/e62993b1.html
开始之前 找到本篇文章之前,假设看官您已经对CI相关工作原理已经熟悉了,且对下面的一些使用场景比较熟悉了(原谅我懒,有问题请leave a comment)
GitHub的ssh配置过程
Hexo的编译过程
一些简单的Linux shell
准备过程 准备一组新的github的deploy公私钥,通过ssh-keygen生成即可,后面需要用到。
GitHub Actions配置过程 在配置actions脚本的时候,需要在仓库的Settings界面先配置两处东西
仓库Settings界面 点开你的仓库,点开Settings
注意圈出来的两个地方,我们需要先设置一下
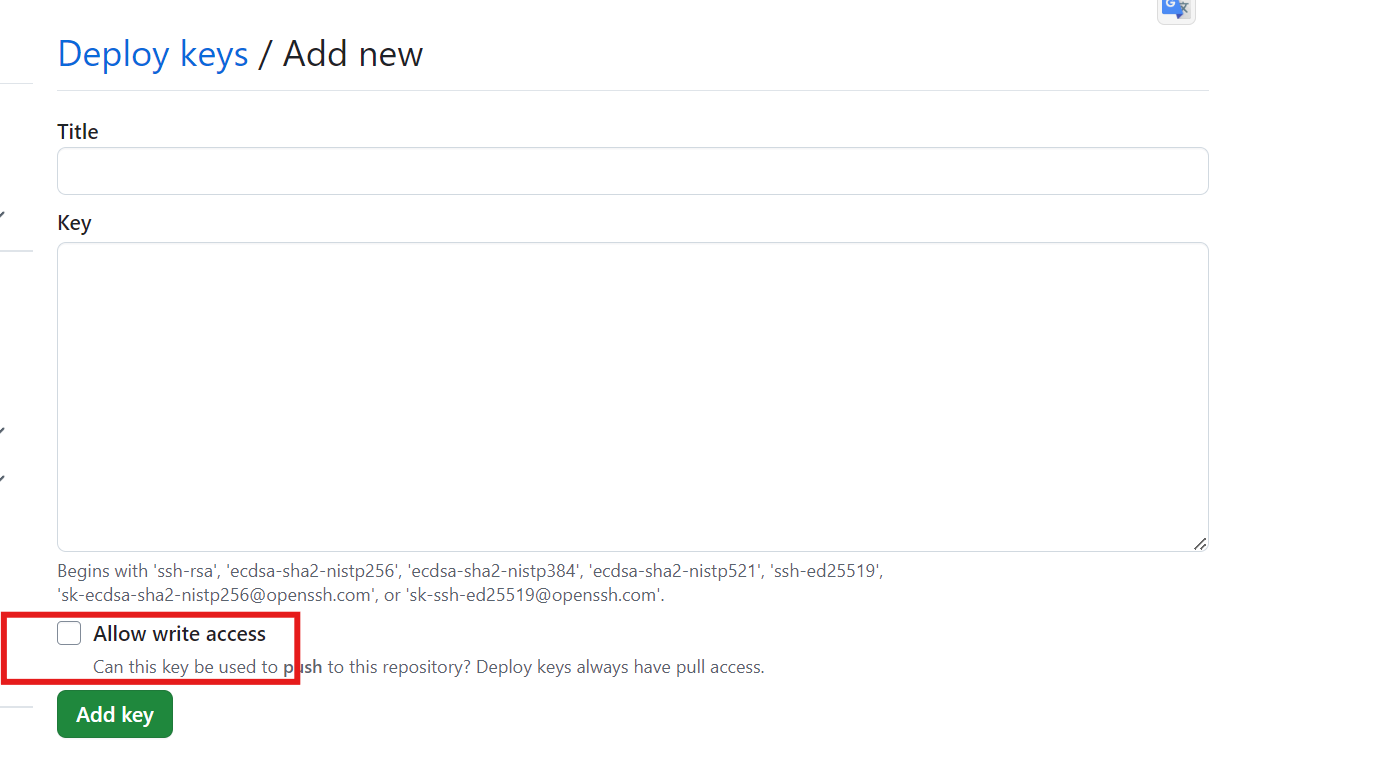
Deploy keys准备过程 中新生成的公钥(id_rsa.pub文件中),不漏的copy上,完了点击右上角的“Add depoly key”之后,在下图中填上,标题随便,Key就是刚才你粘贴的那个公钥内容。注意勾上写权限
Secrets and variables
其中有一个变量,DEPLOY_KEY是上面生成的私钥(id_rsa文件中),完整复制进去即可。
脚本编写 这部分不用过多赘述,直接看我的脚本注释里面即可。
下面是我的脚本内容(包含了若干自己博客所需的hexo插件,你按需更改相关命令即可):
1
2
3
4
5
6
7
8
9
10
11
12
13
14
15
16
17
18
19
20
21
22
23
24
25
26
27
28
29
30
31
32
33
34
35
36
37
38
39
40
41
42
43
44
45
46
47
48
49
50
51
52
53
54
55
56
57
58
59
60
61
62
63
64
65
66
67
68
69
70
71
72
73
74
75
76
77
78
79
80
81
name: hexo_blog_audo_deploy on: push: branches: - master release: types: - published jobs: deploy: runs-on: ubuntu-latest steps: - name: 检查分支 uses: actions/checkout@v2 with: ref: master - name: 安装 Node uses: actions/setup-node@v1 with: node-version: "12.x" - name: 安装 Hexo run: | export TZ='Asia/Shanghai' npm install hexo-cli -g --save - name: 缓存 Hexo id: cache uses: actions/cache@v1 env: cache-name: cache-node-modules with: path: node_modules key: ${{ runner.os }}-build-${{ env.cache-name }}-${{ hashFiles('**/package-lock.json') }} restore-keys: | ${{ runner.os }}-build-${{ env.cache-name }}- ${{ runner.os }}-build- ${{ runner.os }}- - name: 安装依赖 if: steps.cache.outputs.cache-hit != 'true' run: | npm install hexo-theme-next --save npm install hexo-deployer-git --save npm install hexo-generator-searchdb --save npm install hexo-generator-feed npm install hexo-wordcount --save npm install hexo-abbrlink --save npm install lozad --save npm uninstall hexo-generator-index --save npm install hexo-generator-index-pin-top --save npm install --save - name: 处理相关变量 run: | # 先将主题配置文件中的关于gitalk的敏感信息替换成实际在上述settings中配置的,调用方式就是 **secrets.你刚才配置的变量名称**(我使用的next主题,按你实际使用的主题配置更改) sed -i 's/GITALK_CLIENT_ID/${{ secrets.GITALK_CLIENT_ID }}/g' ./_config.next.yml sed -i 's/GITALK_CLIENT_SECRET/${{ secrets.GITALK_CLIENT_SECRET }}/g' ./_config.next.yml # 处理自定义配置(这里主要是处理一个插件里面的内容,我需要自定义一些玩意儿,所以我这么处理了,你没有这个需求大可删了下面三行) git clone -b customer_config https://github.com/nimbusking/nimbusking.github.io.git temp cp -f ./temp/post-meta.njk ./node_modules/hexo-theme-next/layout/_partials/post rm -rf ./temp - name: 配置环境 env: DEPLOY_KEY: ${{ secrets.DEPLOY_KEY }} run: | mkdir -p ~/.ssh/ echo "$DEPLOY_KEY" > ~/.ssh/id_rsa chmod 600 ~/.ssh/id_rsa ssh-keyscan github.com >> ~/.ssh/known_hosts git config --global user.email "useremail" git config --global user.name "username" ssh-keygen -y -f ~/.ssh/id_rsa - name: 部署 Nimbusk博客 run: | hexo clean hexo d
没写那么细致,一个简单的actions脚本就完成了,不是特别复杂。
最新actions脚本(2024.11) 上述脚本在github actions最新规范中,部分语法以及过时,未来github可能会强制禁用这些过时版本。第一个错误:
1
2
3
4
5
6
7
8
npm error A complete log of this run can be found in: /home/runner/.npm/_logs/2024-11-07T11_03_02_796Z-debug-0.log npm error code ENOTEMPTY npm error syscall rename npm error path /home/runner/work/nimbusking.github.io/nimbusking.github.io/node_modules/algoliasearch npm error dest /home/runner/work/nimbusking.github.io/nimbusking.github.io/node_modules/.algoliasearch-hKNgfs9d npm error errno -39 npm error ENOTEMPTY: directory not empty, rename '/home/runner/work/nimbusking.github.io/nimbusking.github.io/node_modules/algoliasearch' -> '/home/runner/work/nimbusking.github.io/nimbusking.github.io/node_modules/.algoliasearch-hKNgfs9d' npm error A complete log of this run can be found in: /home/runner/.npm/_logs/2024-11-07T11_04_14_147Z-debug-0.log
第二个错误:
1
2
3
4
5
6
7
Run npm run build > hexo-site@0.0.0 build > hexo generate sh: 1: hexo: not found Error: Process completed with exit code 127.
第三个错误:
1
2
3
4
5
6
npm error Missing script: "build" npm error npm error To see a list of scripts, run: npm error npm run npm error A complete log of this run can be found in: /home/runner/.npm/_logs/2024-11-07T14_34_48_353Z-debug-0.log Error: Process completed with exit code 1.
第四个错误:
第五个错误:
至此,在上述问题折腾了我整整4-5个小时,才搞定,贴上最新的配置脚本:
1
2
3
4
5
6
7
8
9
10
11
12
13
14
15
16
17
18
19
20
21
22
23
24
25
26
27
28
29
30
31
32
33
34
35
36
37
38
39
40
41
42
43
44
45
46
47
48
49
50
51
52
53
54
55
56
57
58
59
60
name: depoloy_pages on: push: branches: - main jobs: build: runs-on: ubuntu-latest steps: - uses: actions/checkout@v4 with: token: ${{ secrets.TOKEN }} submodules: recursive - name: Use Node.js 20 uses: actions/setup-node@v4 with: node-version: "20" - name: Cache NPM dependencies uses: actions/cache@v4 with: path: node_modules key: ${{ runner.OS }}-npm-cache restore-keys: | ${{ runner.OS }}-npm-cache - name: Install Dependencies run: | # npm install https://github.com/foreveryang321/hexo-asset-image.git --save npm install - name: Replace some vars run: | sed -i 's/GITALK_CLIENT_ID/${{ secrets.GITALK_CLIENT_ID }}/g' ./_config.next.yml sed -i 's/GITALK_CLIENT_SECRET/${{ secrets.GITALK_CLIENT_SECRET }}/g' ./_config.next.yml # 处理自定义配置 git clone -b customer_config https://github.com/nimbusking/nimbusking.github.io.git temp cp -f ./temp/post-meta.njk ./node_modules/hexo-theme-next/layout/_partials/post rm -rf ./temp - name: Build run: npm run build - name: Upload Pages artifact uses: actions/upload-pages-artifact@v3 with: path: ./public deploy: needs: build permissions: pages: write id-token: write environment: name: github-pages url: ${{ steps.deployment.outputs.page_url }} runs-on: ubuntu-latest steps: - name: Deploy to GitHub Pages id: deployment uses: actions/deploy-pages@v4
最新actions脚本(2026.5) 本次主要更新就是github action于2026年6月份前后将全面禁止node 20版本运行,本次更新就是为了适配这个,基本上就是更新了下面俩:
增加强制使用node24的参数,为后面github强制升级平滑过渡
更新action版本:就是下面脚本中的@v4更新为@v6,当然不是所有的actions都有v6版本的
1
2
3
4
5
6
7
8
9
10
11
12
13
14
15
16
17
18
19
20
21
22
23
24
25
26
27
28
29
30
31
32
33
34
35
36
37
38
39
40
41
42
43
44
45
46
47
48
49
50
51
52
53
54
55
56
57
58
59
60
61
62
63
64
name: depoloy_pages on: push: branches: - main env: FORCE_JAVASCRIPT_ACTIONS_TO_NODE24: true jobs: build: runs-on: ubuntu-latest steps: - uses: actions/checkout@v6 with: token: ${{ secrets.TOKEN }} submodules: recursive - name: Use Node.js 24 uses: actions/setup-node@v6 with: node-version: "24" - name: Cache NPM dependencies uses: actions/cache@v5 with: path: node_modules key: ${{ runner.OS }}-npm-cache restore-keys: | ${{ runner.OS }}-npm-cache - name: Install Dependencies run: | # npm install https://github.com/foreveryang321/hexo-asset-image.git --save npm install - name: Replace some vars run: | sed -i 's/GITALK_CLIENT_ID/${{ secrets.GITALK_CLIENT_ID }}/g' ./_config.next.yml sed -i 's/GITALK_CLIENT_SECRET/${{ secrets.GITALK_CLIENT_SECRET }}/g' ./_config.next.yml # 处理自定义配置 git clone -b customer_config https://github.com/nimbusking/nimbusking.github.io.git temp cp -f ./temp/post-meta.njk ./node_modules/hexo-theme-next/layout/_partials/post rm -rf ./temp - name: Build run: npm run build - name: Upload Pages artifact uses: actions/upload-pages-artifact@v3 with: path: ./public deploy: needs: build permissions: pages: write id-token: write environment: name: github-pages url: ${{ steps.deployment.outputs.page_url }} runs-on: ubuntu-latest steps: - name: Deploy to GitHub Pages id: deployment uses: actions/deploy-pages@v5